Skip navigation

Here it is, the door is finally installed. The track from which it hangs has been shimmed to be level so the door is always perfectly parallel to the door. (No one’s house has ceilings and floors that are perfectly parallel once the house settles.) The door literally glides through the track as if it weighed only a few pounds. (It weighs a lot more than that!) It’s beautiful! Exactly the way I imagined it.

Thanks for following along!Door from inside the room.Door from inside the room, open a bit.Door open from the hall.

The door is finally complete! The rice paper is taped in, the second set of rails is glued in place, the hardware is screwed in. It’s ready to be hung!Taping the rice paper.Detail.

Here is the door with the rice paper and 2nd set of rails laid in place. I’ll need to use the rice paper tape to adhere the rice paper to both sides of the rails, and then I’ll have to make sure the paper edges are straight. After that I have to attach the top hardware that will hold the door in the ceiling track. I’m hoping to have the door hung by the weekend!Rice paper laid in with 2nd set of rails.Holding the hardware in place to show where it will go.

Sketch of door in place.

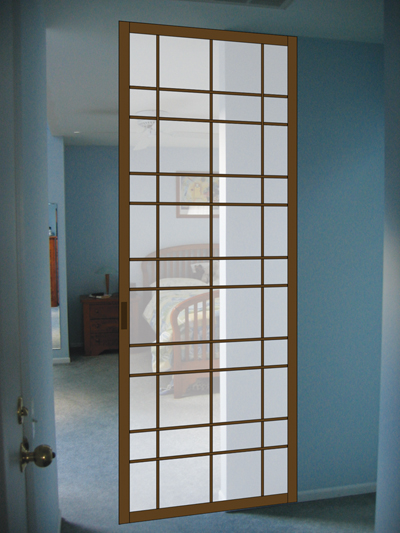
During the time I spent sketching, measuring, re-sketching, and re-measuring for this project, I made this digital compositon of what I imagined the door would look like. This sketch is actually from May of last year!

So although it took about 7 months of planning (okay, I took some time in there for a few other projects), it’s taken roughly 3 weeks to build, working mostly weekends and some evenings. (I wish furniture building were my full-time job!) All pieces of the door have their final 3 coats of poly, all pieces are built, both door pulls are chiseled, glued, and poly’d. The final steps are:
1. Spray paint the track from which the door will hang. It’s aluminum and it would look much better in black than it will in shiny silver.
2. Lay in the rice paper, set in the back set of inner rails, tape, glue and firmly attach all.
3. Attach top hardware that will sit inside the track.
4. Hang track and hang door!

Almost done. I plan to have the door hung by EOD Saturday, 2.16.08. I’ll post pics of course.

Chuck helped me decide that the door definitely needed door pulls, and these ebony pulls I found on a shoji materials website were perfect! I chiseled out the space for the first one (very carefully!), then glued it in place and polyurethaned over it. One splinter and one blood blister later, it looks beautiful! Well worth the work. (Took about 2+ hours to chisel it out completely, minus the 10 minutes it took to take out the splinter.)Chiseling out the space.Door pull set in place.Pull glued in with poly.

After lots of small shavings, the rice paper is cut and fits in place. It needs to be in 2 pieces, since the longest length available for the rice paper wasn’t as long as the door itself. The seam will be hidden under a rail so it won’t be seen. I might use the leftover rice paper to make a shoji lamp. (Stay tuned.)Rice paper laid out in place, not glued.

Just one coat of poly in this pic.The frame now has 2 coats of poly on one side and one coat on the other. It will all have 3 coats total when its done.Just one coat of poly in this pic.

All the rails for one side of the door have been cut, fitted and glued. Next step – polyurethane!one side

All rails laid out, uncut.Better detail of rails, uncut.Here is the door with all the rails laid out. Lots more to sand and cut, then glue, polyurethane and add the rice paper!

These are some pics of the materials for the door. I built the door frame this past weekend. The door will be made out of solid mahogany. The rails still need to be sanded and cut. The rice paper is a laminated, durable rice paper that can stand up to daily use and small, sticky fingers.The door frame assembled.The wood materials.Rice paper in a roll.